最后一个实验要求做一个RayTracing的小东西,本实验采用了Cornell Box作为模型,实现了简单的tracer。 主要从以下几个方面简单的介绍一下:
算法框架
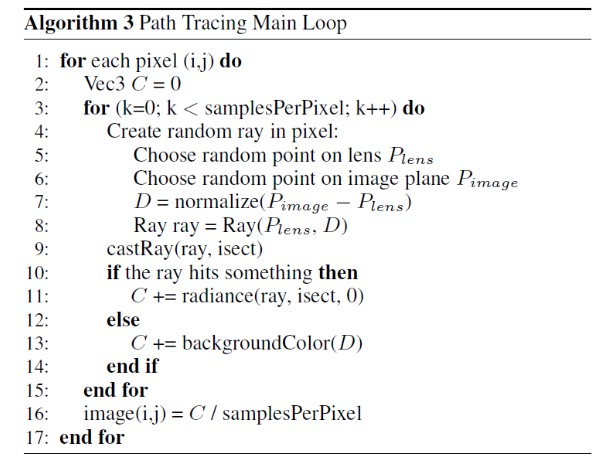
算法伪代码如上,即对每个像素点随机选取光线方向,如果击中点的话对其进行render,并根据反射、折射等递归计算,没有击中点则返回背景颜色。
数学基础
在实验的过程中,调用glm后发现实际的速度并没有快很多,反而各种方法比较凌乱,因此自己实现了一个Vector的struct:
1
2
3
4
5
6
7
8
9
10
11
12
13
14
15
16
17
18
19
20
21
22
23
24
25
26
27
28
29
30
31
32
struct Vec {
double x, y, z;
Vec(double x_ = 0, double y_ = 0, double z_ = 0) {
x = x_; y = y_; z = z_;
}
Vec operator+(const Vec &b) const {
return Vec(x + b.x, y + b.y, z + b.z);
}
Vec operator-(const Vec &b) const {
return Vec(x - b.x, y - b.y, z - b.z);
}
Vec operator*(double b) const {
return Vec(x*b, y*b, z*b);
}
Vec mult(const Vec &b) const {
return Vec(x*b.x, y*b.y, z*b.z);
}
Vec& norm() {
return *this = *this * (1 / Qsqrt(x*x + y*y + z*z));
}
double dot(const Vec &b) const {
return x*b.x + y*b.y + z*b.z;
}
Vec cross(const Vec &rhs) {
return Vec(y * rhs.z - z * rhs.y,
z * rhs.x - x * rhs.z,
x * rhs.y - y * rhs.x);
}
};
这里面有个叫做Qsqrt的东西,其实是鼎鼎有名的卡马克常数的那个平方根快速算法,具体解释我可能有时间再写一篇博客探讨下:
1 |
|
光线
光线类,o和d分别表示起始位置和方向 1
2
3
struct Ray { Vec o, d; Ray(Vec o_, Vec d_) : o(o_), d(d_) {} };
球
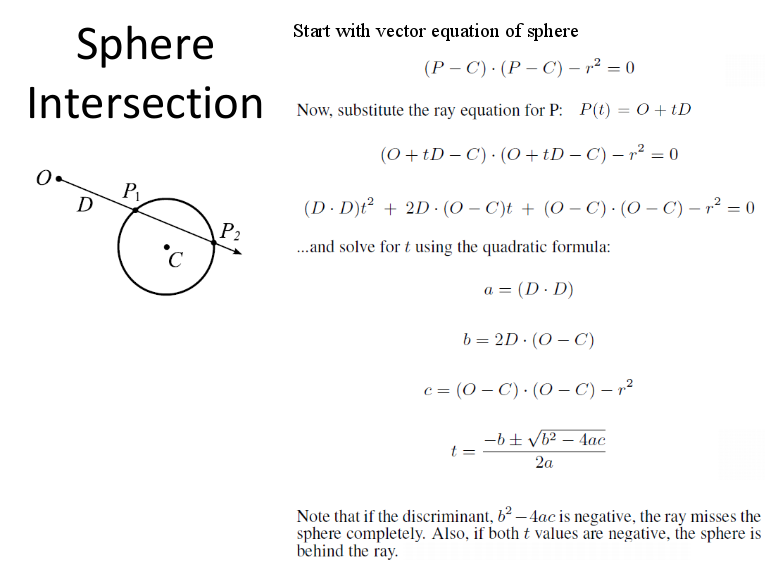
之后写了一个叫做Sphere的类,材质包括漫反射、反射与折射,并实现一下与光线相交的函数,返回光线的参数方程(o+td)中第一个交点的t:
1 |
|
场景构建
由于当半径很大的时候,球的部分表面可以被看做是平面,因此不必单独写平面的类,直接调用sphere就好。 下面的代码设置了上下左右前后六个表面、灯光和材质分别是反射和折射的两个球:
1 | Sphere spheres[] = {//Scene: radius, position, emission, color, material |
图像、采样率、摄像机的设置
设置一些基本的图像参数,用于进一步的构建图像: 1
2
3int w = 1024, h = 768, samps = 1;
Ray cam(Vec(50, 52, 295.6), Vec(0, -0.042612, -1).norm()); // camera position direction
Vec cx = Vec(w*.5135 / h), cy = (cx.cross(cam.d)).norm()*.5135, r, *c = new Vec[w*h];
循环处理像素点
对于每个像素点,选取它的四邻域进行随机取样,取样的个数就是采样率的samps:
1 | for (int y = 0; y<h; y++) { // Rows |
其中,radiance就是进行raycast的递归过程,计算之后对各个采样点计算得来的颜色取平均值。
RayCast过程
即radiance过程,是一个递归的过程,首先intersect方法得到这个光线击中的物体:
1 | inline bool intersect(const Ray &r, double &t, int &id) { |
设置了递归的深度是5,得到击中的物体后计算法向量(和背面剔除后的法向量),如果递归超过深度则按照概率衰减或直接返回强度(灯光)
1
2
3
4
5
6
7
8
9
10
11
12double t;
int id = 0;
if (!intersect(r, t, id))
return Vec();
const Sphere &obj = spheres[id];
Vec x = r.o + r.d*t, n = (x - obj.p).norm(), nl = n.dot(r.d)<0 ? n : n*-1, f = obj.c;//n:normal nl:backface culling normal
double p = f.x>f.y && f.x>f.z ? f.x : f.y>f.z ? f.y : f.z; // p:max refl
if (++depth>5)
if (random()<p)
f = f*(1 / p);
else
return obj.e;
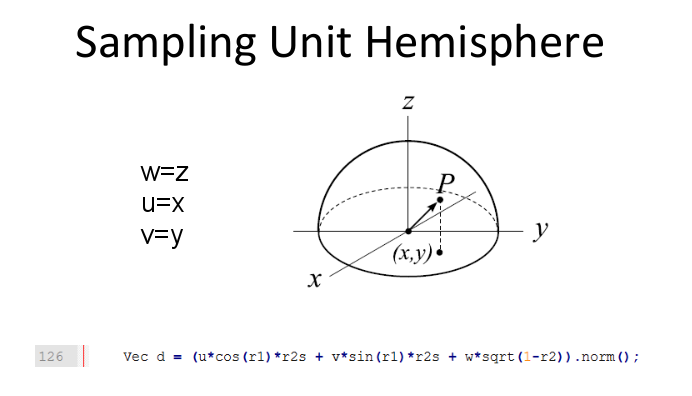
之后是漫反射、镜面反射的着色过程,在之前的博客中有提及,这里不再赘述计算过程。需要注意的是,漫反射之后的来源光线是随机选取的,随机的过程可以用下图表示。
1 | if (obj.refl == DIFF) { |
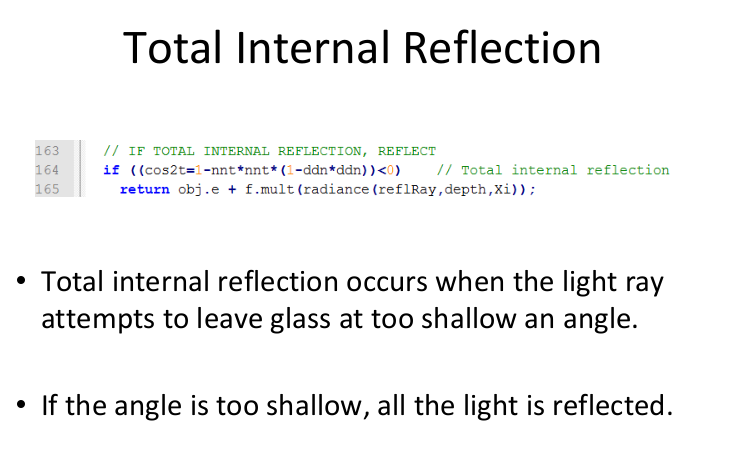
之后是折射与反射的判断关系……首先要复习一下全反射(Total internal reflection )的相关知识,判断一下是需要进行全反射就好还是需要进一步计算折射:
如果有折射,用下面这张图中的公式计算: 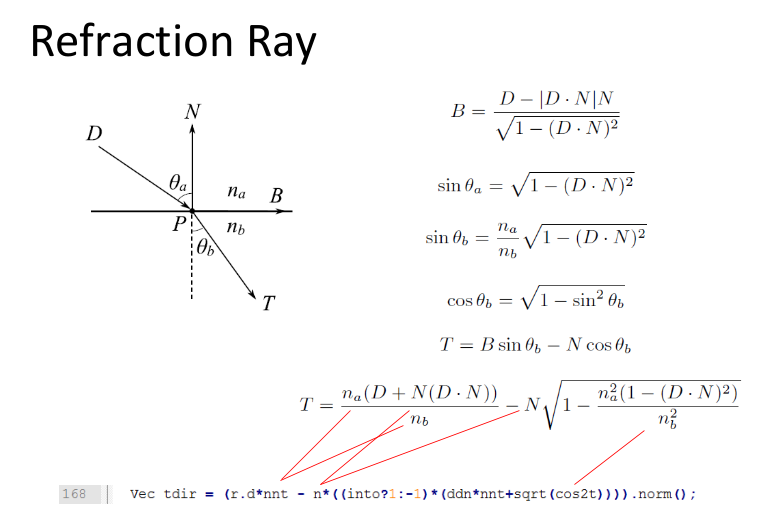
1 | Ray reflRay(x, r.d - n * 2 * n.dot(r.d)); // Ideal dielectric REFRACTION |
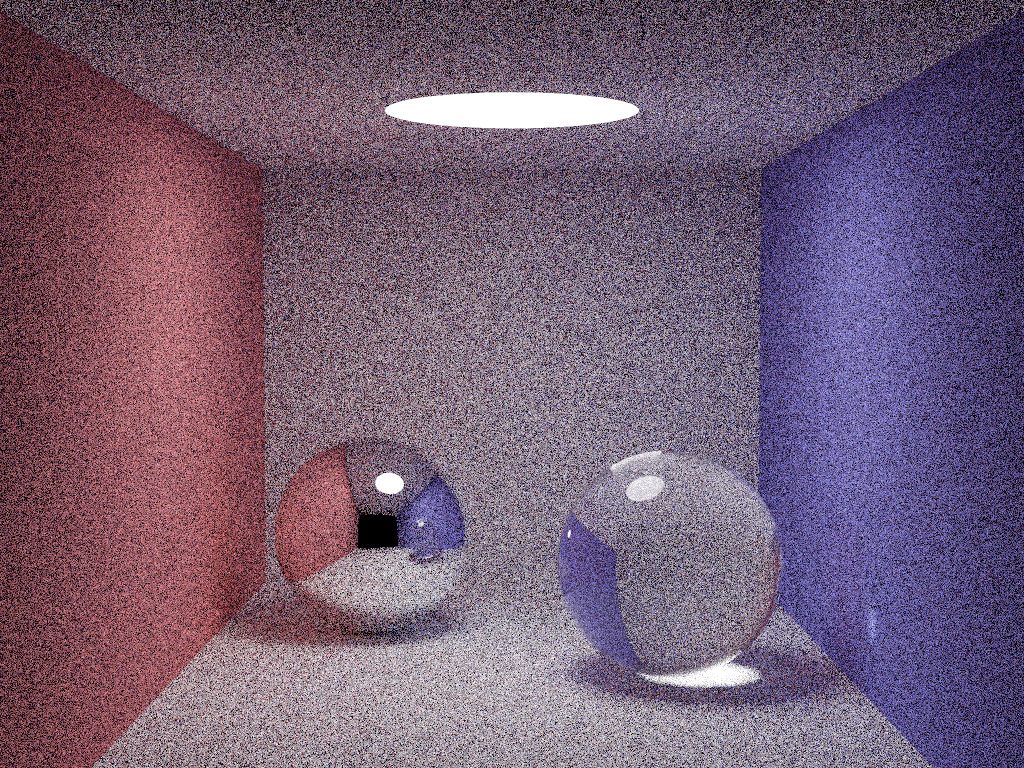
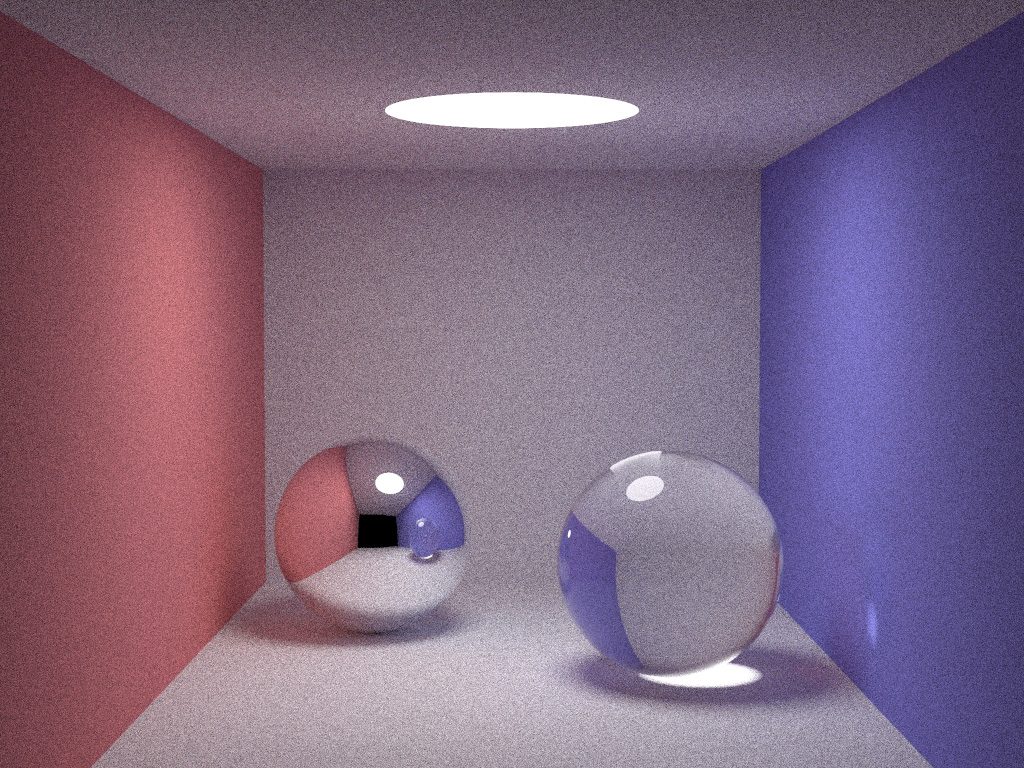
最后结果
输出ppm图像如下: 1
2
3
4
5
6FILE *f;
errno_t err;
err = fopen_s(&f, "image.ppm", "w");
fprintf(f, "P3\n%d %d\n%d\n", w, h, 255);
for (int i = 0; i<w*h; i++)
fprintf(f, "%d %d %d ", toInt(c[i].x), toInt(c[i].y), toInt(c[i].z));
采样率低的时候噪点很多,随着采样率升高效果逐渐平滑和稳定: